
Strategy for Mac and Windows machines
The idea here is to set up the SD card with both a Windows MBR partition table and an Amiga RDB partition table so that the card will be readable on Amiga, Mac, and Windows machines. Both the Windows MBR and the Amiga RDB start at the very beginning of the drive, so normally it's not possible to have the two on the same physical media, but the SCSI2SD device has a slick feature. It allows you to define where on the SD card the Amiga drive begins. Using this feature, the Amiga drive can be moved up to make room for the Windows MBR, which must be located at the very beginning of the SD card.

The Amiga drive occupies the area starting at 2 MB from the beginning of the SD card, and ending at exactly 2 GB. With this scheme in place, both the Windows MBR and the Amiga RDB can coexist on the same physical media. Also, the Amiga can't touch the first 2 MB of the SD card, so there's no chance of some Amiga software inadvertently corrupting the Windows MBR.
SD cards work best when data is written in chunks that match the erase block size. This size can be anywhere from 64 KB on up, but the Amiga Fast File System will write data as it sees fit, so there's no good way to optimize the mountlist in that respect. However, making sure that each partition starts on a segment boundary will help. Most SD cards have a 4 MB segment size, so as a rule of thumb each partition should start on a 4 MB boundary.
I made the Workbench partition 20 MB, and the application/data partition 120 MB. Feel free to make your partitions bigger, but remember that the larger the partition, the more RAM it uses. I chose my partition sizes to provide the storage I needed while using as little RAM as possible. Remember that the Amiga doesn't see the first 2 MB of the SD card, so the first partition will have to start at a 2 MB offset in order to be aligned to the SD card's 4 MB segment boundary.
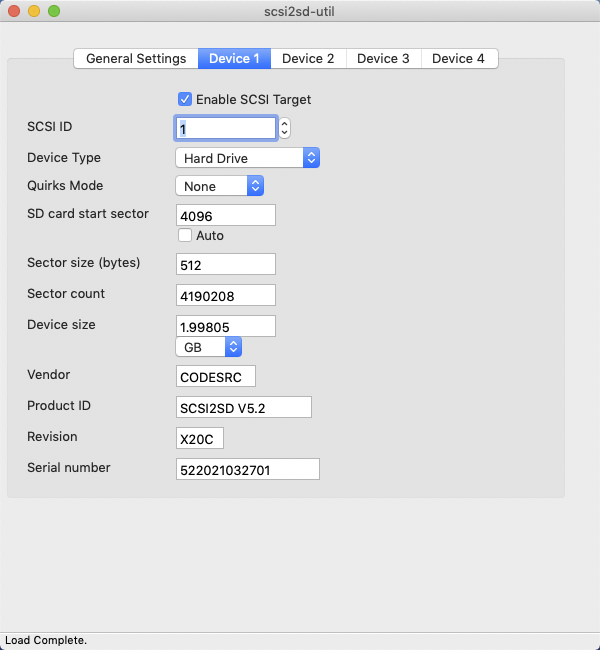
Setting up the SCSI2SD drive
Set the SCSI ID to fit your needs, and then set the SD card start sector to 4096, and change the Sector count to 4190208. You can fill in the Vendor, Product ID, Revision and Serial number as you like. I used some of the information printed on the SCSI2SD PCB, and made up the rest.
The Amiga drive ends at exactly 2 GB on the SD card so that anything following it will be aligned to a 4 MB segment boundary.
Using the right tools
Both the Windows Partition Manager and the Apple Disk Utility are completely worthless, so we will be using GPartEd here. If you have a Linux machine, then you most likely already have GPartEd, and you can skip this next section.
If you have an optical drive in your Mac or Windows machine, then simply download the GPartEd Live ISO image, and burn it to a CD.
For 32 bit machines: https://downloads.sourceforge.net/gpart ... 1-i686.iso
For 64 bit machines: https://downloads.sourceforge.net/gpart ... -amd64.iso
If you don't have an optical drive, then you will need a USB thumb drive. Be sure to back up your thumb drive before proceeding since it will be completely erased.
Download balenaEtcher and the GPartEd USB image that I created, and then use balenaEtcher to write the image to the thumb drive.
https://www.balena.io/etcher/
https://thehippiecampus.com/files/gparted.zip
Booting GPartEd Live
Be sure to start with a fresh SD card, or if there is any data on the card be sure to back it up before proceeding.
Leave the SD card reader unplugged.
Plug the thumb drive into your computer, and then restart.
If you are using a Mac, hold down the option key until you get to the startup manager screen. Select the USB drive named "EFI Boot", and then press the return key.
If you are using a Windows machine, then refer to your BIOS documentation for instructions on how to boot from an external drive.
Depending on your machine, it can take a while to boot from the thumb drive, so have patience.
Setting up the SD card
WARNING -- THERE IS NO SAFETY NET HERE. YOU CAN EASILY DESTROY ALL OF THE DATA ON ANY OR ALL OF YOUR HARD DRIVES! BE SURE YOU READ AND UNDERSTAND THESE INSTRUCTIONS BEFORE PROCEEDING.
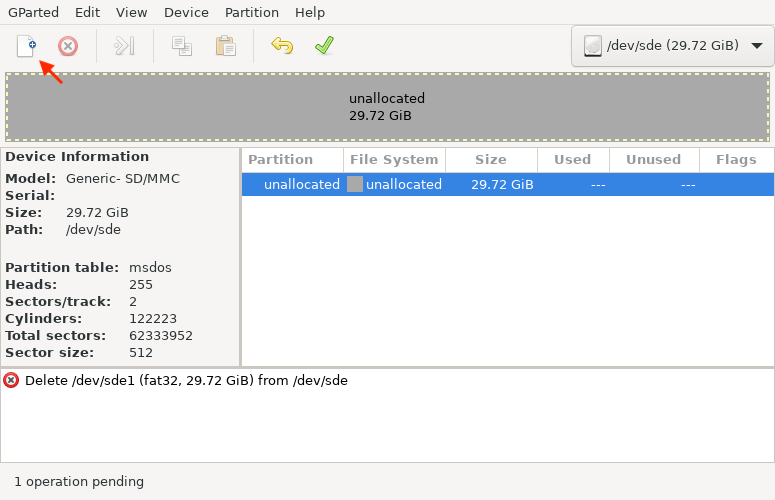
Once things are up and running, you will see the GPartEd main window.
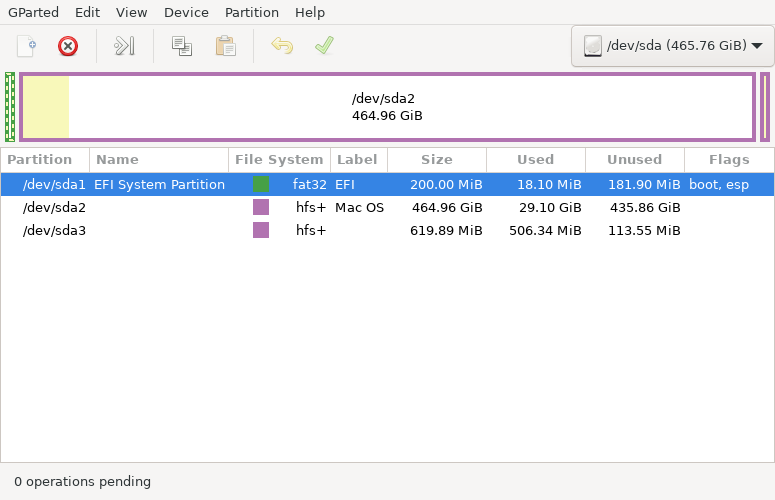
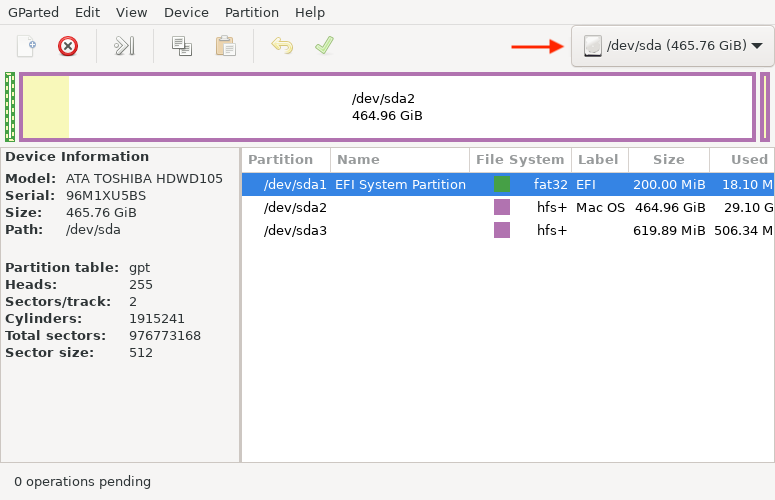
Select "Device information" from the "View" menu.
Click on the drop down menu in the upper right corner of the window, and make a note of the drives in the list.
Plug in the SD card reader.
Select "Refresh Devices" from the "GParted" menu.
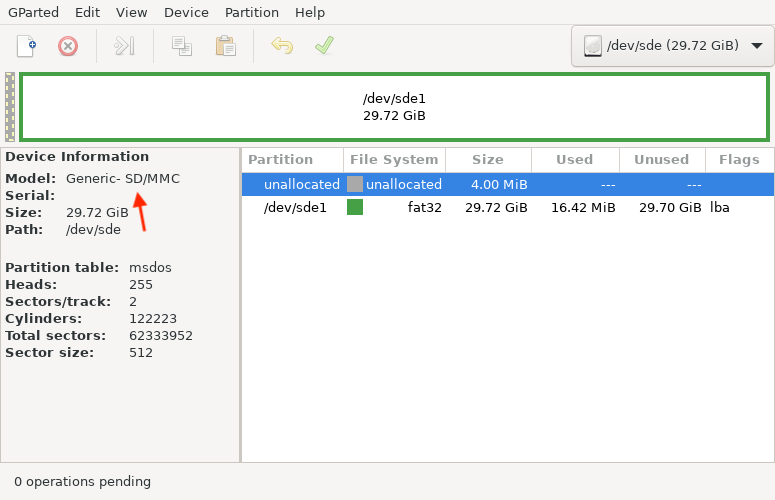
Click on the drop down menu once again, and select the new drive that showed up in the list.
Look at the device information in the pane on the left side of the window. The model field should indicate that it's an SD card. BE SURE THAT YOU HAVE SELECTED YOUR SD CARD!
Now we want to delete any existing partitions.
Select the FAT 32 partition.
Click on the delete icon on the toolbar.

If there was more than one partition, then repeat until all partitions are deleted. You should now see a drive with only unallocated space.
Now it's time to create the SCSI2SD partitions.
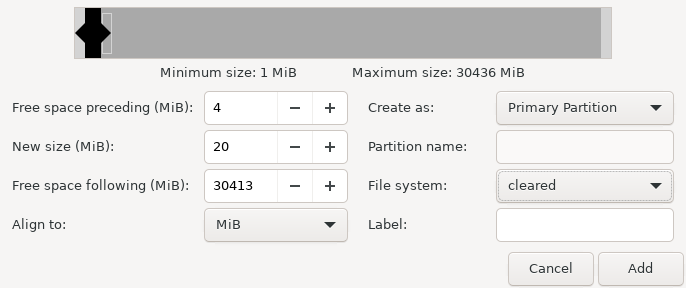
Click on the new partition icon in the toolbar, and enter the parameters for the first Amiga partition.
The "Free space preceding (MiB):" field MUST be set to 4.
Set the size for the first partition, and then set the file system to "cleared."
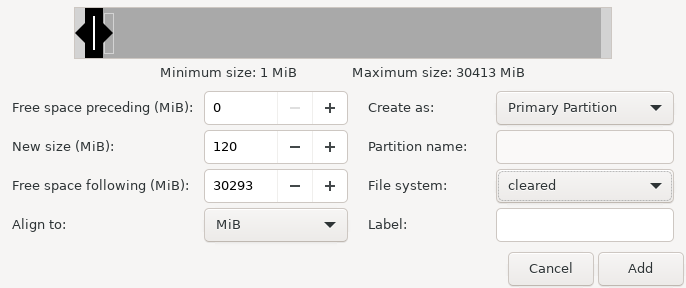
Do the same thing for the second Amiga partition, but keep the "Free space preceding (MiB):" field set to 0.
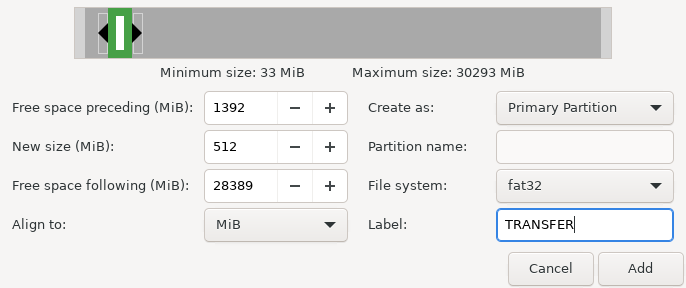
Finally, create the FAT32 partition that will be used for transferring files. I made it 512MB, and placed it up at the very top of the SCSI2SD drive.
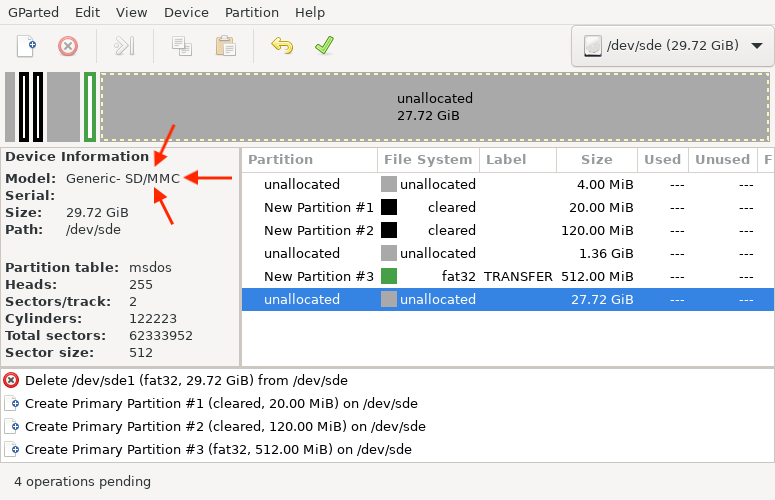
Now you will see the list of partitions, and a note at the bottom of the window that says "4 operations pending." This means that the partitions have not yet been created on the SD card. Clicking the green check mark in the tool bar will tell GPartEd to write the partitions. Be very careful here.
MAKE SURE YOU ARE WORKING ON YOUR SD CARD. CHECK IT, CHECK IT AGAIN, AND CHECK IT A THIRD TIME. ONCE YOU CLICK THE GREEN CHECK MARK THERE IS NO GOING BACK!
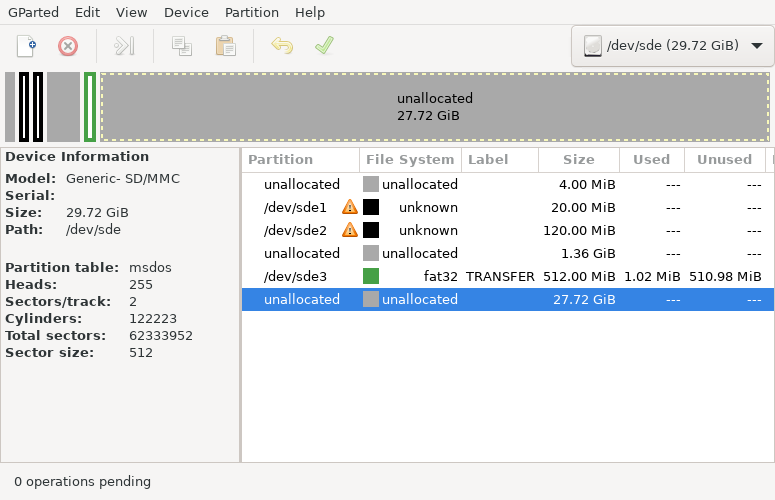
If everything went right, then you should now see a list of the actual partions on the SD card.
Setting up the Amiga partitions
In this example we'll be using HDToolBox to set up the partitions. Boot the Amiga, and then bring up HDToolBox.
The first step is to define a new drive type for SCSI2SD. Here we want to manually enter values that work well for the SD card. I chose to make the cylinder size 64 KB because it's a nice round number, and it divides evenly into 4 MB. Set the cylinders to 32736, heads to 1, and blocks per track to 128. This will define a drive that matches the drive that we defined for our multi-platform strategy.

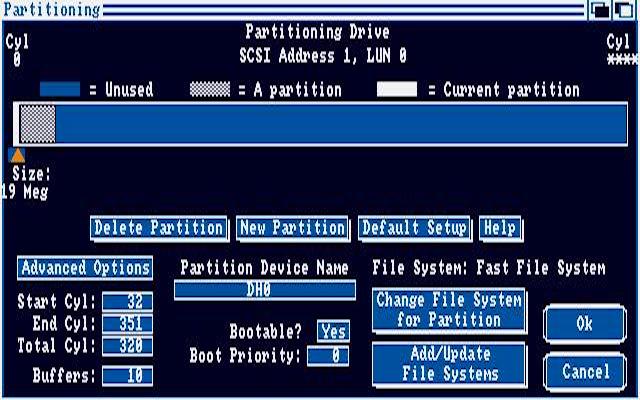
The next step is to modify the partitions that HDToolBox automatically created. Here we want to define the partitions so that they match those that we created in the Windows MBR. Select the first partition, and set the start cylinder to 32. This puts the first partition at 2 MB from the beginning of the Amiga drive, which is actually 4 MB from the beginning of the SD card. Set the end cylinder to 351, the buffers to 10, and then give the partition a name, e.g., DH0.
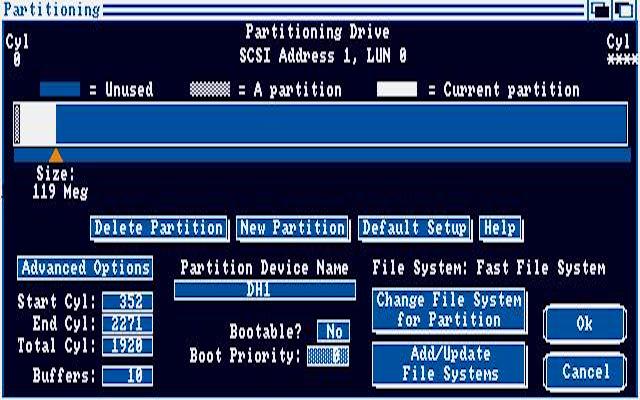
Select the second partition, and set the start cylinder to 352, end cylinder to 2271, buffers to 10, and then give it a name.
When you are done, save the changes to the drive. I decided not to define the FAT32 partition in HDToolBox, and instead mount it manually using a mountlist entry.
Mountlist Entries
My Workbench partition mountlist entry. The partition starts on the SD card at 2 MB + 32 * 128 * 512 = 4 MB, and has a size of 320 * 128 * 512 = 20 MB.
Code: Select all
DH0:
	Device = StarDrive.device
	Flags = 0x7070
	StackSize = 4096
	Interleave = 0
	Buffers = 10
	BufMemType = 1
	Priority = 10
	Mount= 1

	FileSystem = L:FastFileSystem
	DOSType = 0x444f5301
	GlobVec = -1
	Reserved = 2

	Unit = 1
	LowCyl = 32 ; HighCyl = 351
	Surfaces = 1
	BlocksPerTrack = 128
	PreAlloc = 0
#
My application/data partition mountlist entry. The partition starts on the SD card at 2 MB + 352 * 128 * 512 = 24 MB, and has a size of 1920 * 128 * 512 = 120 MB.
Code: Select all
DH1:
	Device = StarDrive.device
	Flags = 0x7070
	StackSize = 4096
	Interleave = 0
	Buffers = 10
	BufMemType = 1
	Priority = 10
	Mount= 1

	FileSystem = L:FastFileSystem
	DOSType = 0x444f5301
	GlobVec = -1
	Reserved = 2

	Unit = 1
	LowCyl = 352 ; HighCyl = 2271
	Surfaces = 1
	BlocksPerTrack = 128
	PreAlloc = 0
#
My FAT32 file transfer partition mountlist entry. The partition starts on the SD card at 2 MB +24544 * 128 * 512 = 1.5 GB, and has a size of 8192 * 128 * 512 = 512 MB.
Code: Select all
MS0:
	Device = StarDrive.device
	Flags = 0x7070
	StackSize = 4096
	Interleave = 0
	Buffers = 10
	BufMemType = 1
	Priority = 10
	Mount= 1

	FileSystem = L:fat95
	DosType = 0x46415401
	GlobVec = -1
	Reserved = 0

	Unit = 1
	LowCyl = 24544 ; HighCyl = 32735
	Surfaces = 1
	BlocksPerTrack = 128
	PreAlloc = 0
#
Transferring files
Now it's just a matter of mounting the FAT32 transfer partition on the Amiga.
SCSI2SD allows for hot swapping the SD card. This means that you don't have to shut off your Amiga to remove or insert the card. Just make sure that nothing is accessing the SD card before you remove it.
If you are transferring from your Mac or Windows machine to the Amiga, be sure to issue a DiskChange command after you insert the card into the SCSI2SD.
And that's all there is to it. I hope some of you will find this useful.
